Why Torch Cannot Use Your GPU:
When PyTorch cannot use the GPU, the first thing to understand is this: having a GPU in your computer does not automatically mean PyTorch can use it. PyTorch needs three main things to work with a GPU. First, your system must have a supported GPU. Second, your machine must have a working NVIDIA driver. Third, your PyTorch package must be installed with CUDA support.
Think of it like a car, a road, and fuel. Your GPU is the car. CUDA is the road. The driver and PyTorch build are the fuel and controls. If one piece is missing, the whole setup fails. That’s why many users see torch.cuda.is available returns False even though they have a graphics card installed.
CPU Only PyTorch Installation:
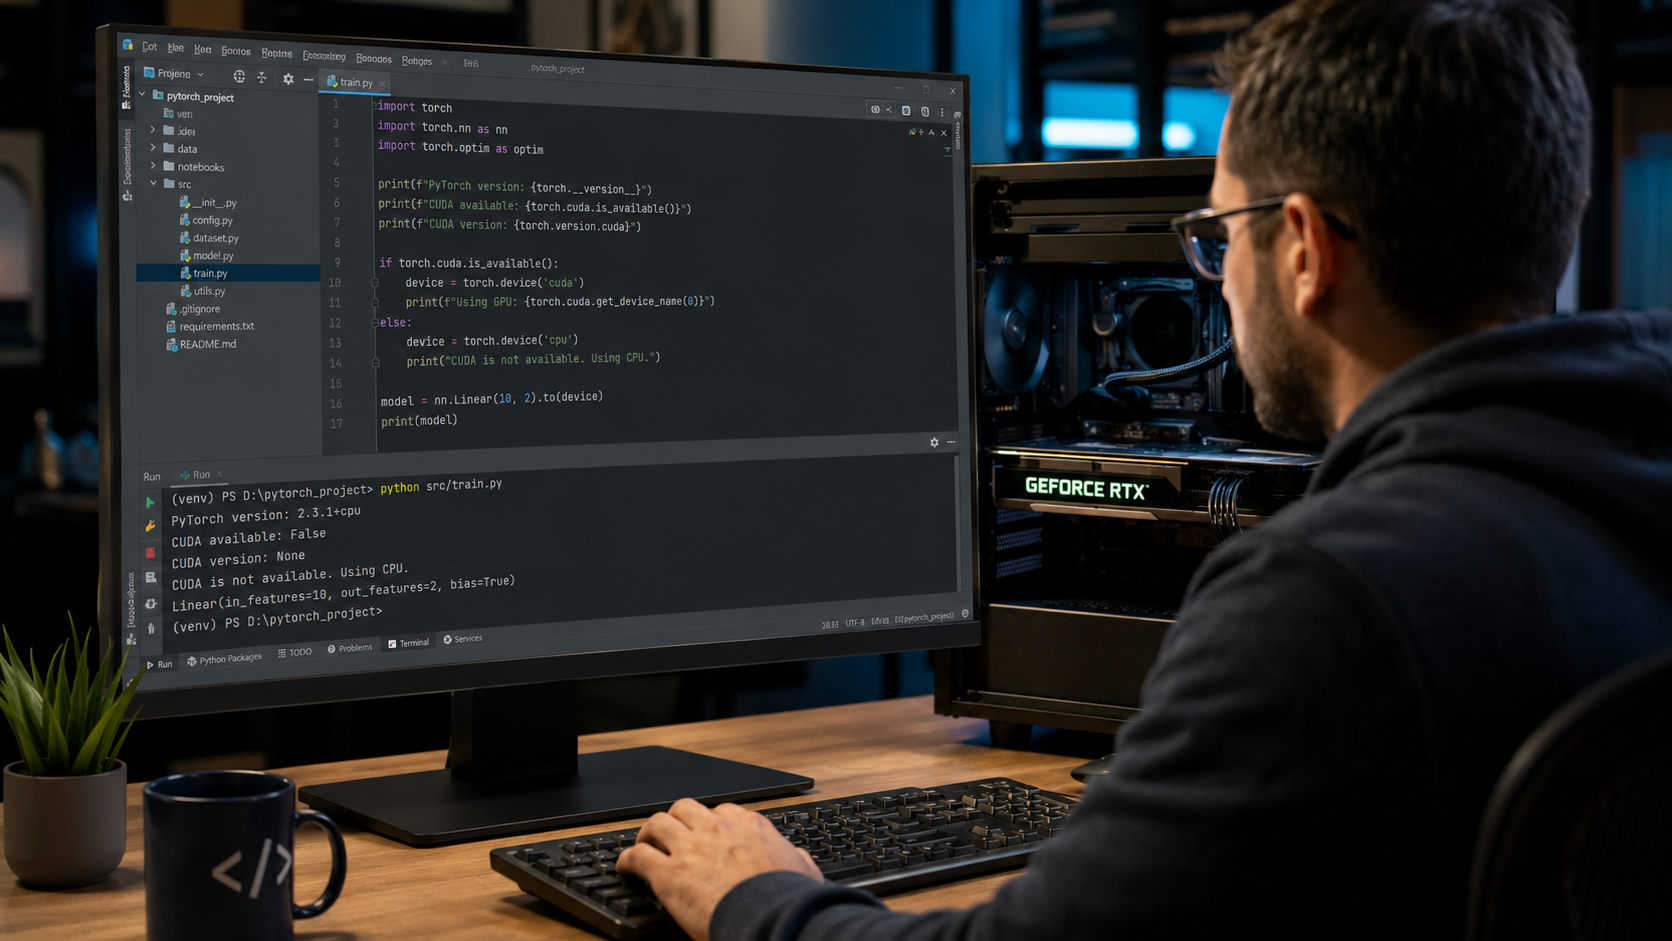
One of the most common reasons Torch cannot use the GPU is a CPU-only installation. This often happens when users install PyTorch with a basic command such as:
pip install torch
In some environments, this may install a build that lacks CUDA support. The package may work perfectly for normal CPU tasks, but it won’t send deep learning work to your GPU.
A CPU-only build is not broken. It is simply not designed for GPU acceleration. That means your code may run, your model may train, and your tensors may work, but everything will happen on the CPU.
To check this, run:
import torch
print(torch.version)
print(torch.version.cuda)
print(torch.cuda.is_available())
If torch.version.CUDA returns None; your PyTorch build likely does not include CUDA support.
If you are unsure whether your workload is actually limited by graphics processing performance, read our guide on What Does GPU Bound Mean to understand how GPU bottlenecks affect application speed.
CUDA, Driver, and GPU Compatibility:
CUDA is the technology that allows PyTorch to use NVIDIA GPUs for faster computation. However, many beginners assume that installing a GPU is enough for PyTorch to automatically use it. In reality, several pieces must work together.
Your GPU needs a compatible NVIDIA driver, and your PyTorch installation must include CUDA support. If any of these components are missing or incompatible, PyTorch may fail to detect the GPU even though the hardware is installed correctly.
For example, a user might have a modern RTX graphics card and a working NVIDIA driver, but if they accidentally install a CPU-only PyTorch package, torch. cuda.is available will still return False.
The good news is that most users do not need to install the full CUDA Toolkit separately. Modern PyTorch releases often include the required CUDA runtime. In many cases, installing the correct PyTorch build and keeping the NVIDIA driver up to date is enough to enable GPU acceleration.
To avoid compatibility issues, always use the official PyTorch installation selector and choose the recommended build for your operating system and CUDA version.
NVIDIA Driver Problems:
Your NVIDIA driver allows your operating system to communicate with your GPU. If the driver is missing, corrupted, or outdated, PyTorch may not be able to see the GPU. This is why checking the driver is one of the first steps.
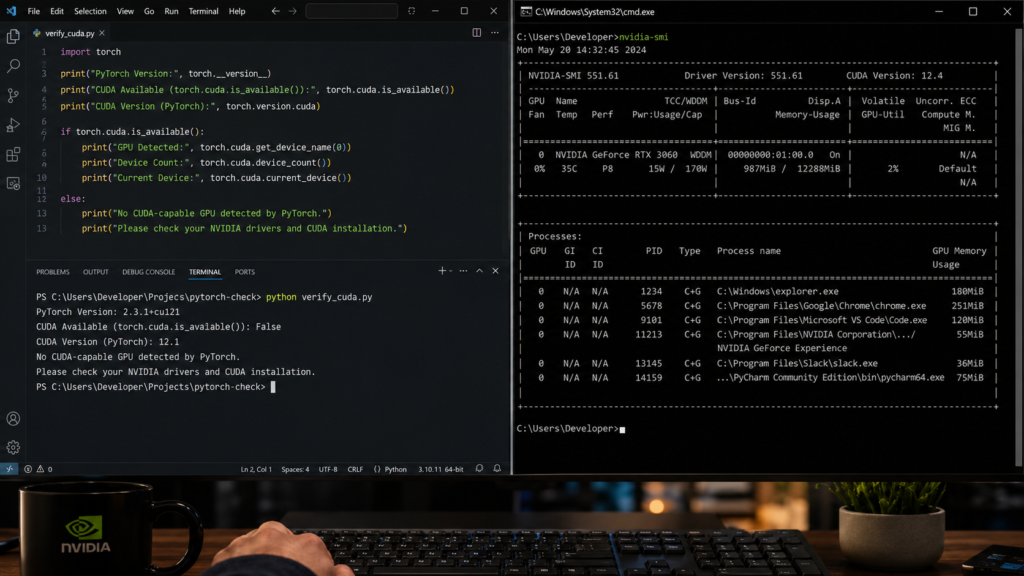
Run this command in your terminal:
nvidia-smi
If it works, you should see your GPU name, driver version, memory usage, and running processes. If it fails, your system may not have a valid NVIDIA driver installed.
Unsupported GPU Hardware:
Some older GPUs may not support the CUDA features needed by modern PyTorch builds. NVIDIA uses compute capability to describe what features a GPU supports. If your GPU is very old, it may not work with the latest CUDA-enabled PyTorch packages.
This is less common for modern gaming, workstation, and server GPUs, but it can happen with older laptops or legacy cards. So, before spending hours reinstalling packages, make sure your GPU is actually CUDA-capable.
How to Check If PyTorch Detects Your GPU:
Before trying random fixes, spend a few minutes identifying the actual cause of the problem. Many users immediately reinstall drivers, CUDA, or PyTorch without knowing which component is failing. This often creates more confusion.
A simple diagnostic process can quickly reveal whether the issue comes from your NVIDIA driver, PyTorch installation, CUDA support, Python environment, or training code. Once you know where the problem is, the solution becomes much easier and faster.
Run the Basic CUDA Test:
Start with this Python test:
import torch
print(PyTorch version:torch version)
print(CUDA available torch.cuda.isavailable)
print(CUDA version torch.version.cuda)
print(GPU count: torch.cuda.device count)
If the output says:
CUDA available: False
Then PyTorch cannot currently use your GPU.
If it says:
CUDA available: True
Then PyTorch can see your GPU, and the problem may be in your code. For example, your model or data may still be on the CPU.
To print the GPU name, run:
if torch.cuda.is available:
print(torch.cuda.get device name(0))
This confirms that PyTorch can access the first GPU.
Check PyTorch and CUDA Versions:
Next, check whether your PyTorch version includes CUDA:
import torch
print(torch version)
print(torch.version.cuda)
A CUDA-enabled PyTorch version may show something like cu121, cu124, or another CUDA tag in the version string. The exact number depends on the build you installed.
If you see CPU in the version, you installed a CPU-only build. In that case, Torch cannot use the GPU because the installed package does not support GPUs.
Use nvidia-smi:
Now check your GPU at the system level:
nvidia-smi
This command does not depend on PyTorch. It checks whether your NVIDIA driver can see the GPU.
If nvidia-smi works but PyTorch says CUDA is not available, the issue is probably your PyTorch installation.
If nvidia-smi does not work, fix your NVIDIA driver first.
What if nvidia-smi fails?
If nvidia-smi fails, try these steps:
- Reinstall the NVIDIA driver.
- Restart your computer.
- Make sure your GPU is enabled in Device Manager on Windows.
- Check whether your laptop is using integrated graphics instead of the NVIDIA GPU.
- On Linux, check whether Secure Boot is blocking the NVIDIA driver.
- Avoid mixing random driver versions from different sources.
Small Tip for Beginners:
Do not install everything at once. First, fix the driver. Then install PyTorch. Then test CUDA. This simple order can save you a lot of trouble.
How to Fix Torch GPU Problems:

Once you know the cause, the fix becomes much easier. The best solution depends on what your checks showed.
To avoid installing the wrong package, use the official PyTorch installation selector available on the PyTorch Get Started Page, which generates the correct installation command for your operating system, package manager, and CUDA version.
Install the Correct CUDA PyTorch Build:
If your PyTorch install is CPU-only, uninstall it first:
pip uninstall torch torchvision torchaudio
Then install the CUDA-enabled version from the official PyTorch selector. A typical pip command may look like this:
pip install torch torchvision torchaudio index-url https://download.pytorch.org/whl/cu121
The exact command may change depending on your operating system and CUDA version, so always confirm it from the official install page.
For conda, the command may look different:
conda install pytorch torchvision torchaudio pytorch-cuda=12.1 -c pytorch -c nvidia
Again, use the official selector to avoid installing the wrong build.
After installation, test again:
import torch
print(torch.cuda.is available)
print(torch.version.cuda)
If it returns True, your PyTorch GPU setup is working.
Move Model and Tensors to GPU:
Sometimes PyTorch can detect the GPU, but your code still runs on CPU. This happens when you forget to move the model and data to the GPU.
Use this pattern:
import torch
device = torch.device(cuda if torch.cuda.isavailable else cpu)
model = model.to(device)
inputs = inputs.to(device)
labels = labels.to(device)
Then, during training, make sure every tensor used in the forward pass is on the same device.
A common mistake is moving the model to the GPU but leaving the input data on the CPU. This causes errors such as:
Expected all tensors to be on the same device
To check a tensor’s device, use:
print(inputs.device)
print(next(model.parameter.device)
Both should show CUDA:0 if they are on the first GPU.
Fix Conda and Pip Conflicts:
A messy Python environment can cause GPU problems. For example, you may install PyTorch with conda, then install another version with pip. After that, Python may import the wrong package.
A clean environment is often the fastest fix.
Create a new conda environment:
conda create -n torch-gpu python=3.11
conda activate torch-gpu
Then install PyTorch using the official command.
If you use virtualenv, create a clean one:
python -m venv torch-gpu-env
Activate it, then install the correct PyTorch package.
Windows-Specific Notes:
On Windows, GPU issues often come from driver problems, wrong Python environments, or installing PyTorch in one environment and running code in another.
Check these points:
- Make sure your IDE uses the same Python environment where PyTorch is installed.
- Restart after installing the NVIDIA driver.
- Use where python in Command Prompt to check your Python path.
- Use pip show torch to check which PyTorch package is installed.
- Avoid installing CUDA manually unless you know your project needs it.
Windows users may also benefit from learning What Is Hardware-Accelerated GPU Scheduling and how it affects graphics resource management.
Linux-Specific Notes:
On Linux, issues may stem from driver installation, Secure Boot, container permissions, or the absence of the NVIDIA Container Toolkit when using Docker.
Check these points:
- Run nvidia-smi.
- Confirm your user has permission to access the GPU.
- If using Docker, run the container with GPU support.
- Avoid mixing distribution drivers with manually installed drivers.
- Reboot after driver changes.
If Torch is not able to use the GPU inside Docker but works on the host machine, the issue is likely your container setup, not PyTorch itself.
Best Practices to Avoid Future GPU Errors
Fixing the issue once is good. Preventing it next time is even better. A stable workflow helps you avoid random GPU failures, broken environments, and wasted training time.
You can also learn How Much GPU Usage Is Normal to better understand whether your GPU is being utilized efficiently during model training.
Keep Environments Clean
Use one environment per project. This is especially important for machine learning because packages like PyTorch, CUDA, NumPy, torchvision, and transformers can depend on specific versions.
A clean project setup may look like this:
conda create -n image-model python=3.11
conda activate image-model
Then install your packages only in that environment.
You can also save your setup:
pip freeze > requirements.txt
Or with conda:
conda env export > environment.yml
This makes it easier to rebuild the same environment later.
Test GPU Access Early:
Before training a large model, run a small GPU test. Do not wait until your dataset is loaded, your model is built, and your training script is 300 lines long.
Use this simple test:
import torch
x = torch.rand(1000, 1000).cuda()
y = torch.matmul(x, x)
print(y.device)
If it prints CUDA:0, your GPU is being used.
You can also check memory usage with:
nvidia-smi
If your Python process appears there while training, your GPU is active.
Use a Safe Device Pattern:
A good PyTorch script should not assume CUDA is always available. Use a device variable:
device = torch.device(cuda if torch.cuda.is available else cpu)
Then send the model and tensors to that device:
model.to(device)
batch = batch.to(device)
This makes your code more portable. It can run on a GPU machine and still work on a CPU-only machine.
Common Error Table:
| Problem | Likely Cause | Quick Fix |
| Torch.cuda.isavailable returns False | CPU-only PyTorch build | Install CUDA-enabled PyTorch |
| nvidia-smi not found | NVIDIA driver missing | Install or repair the driver |
| CUDA is available, but the model is slow | The model is still on the CPU | Use model.to(device) |
| Device mismatch error | Tensors on different devices | Move all tensors to the same device |
| Works in terminal but not IDE | Wrong Python environment | Select the correct interpreter |
| Works on the host but not Docker | The container lacks GPU access | Enable NVIDIA container runtime |
| GPU memory error | Batch size too large | Reduce batch size |
Practical 17-Step Checklist
- Confirm your GPU is NVIDIA and CUDA-capable.
- Run nvidia-smi.
- Update or reinstall the NVIDIA driver if needed.
- Restart your computer.
- Check your active Python environment.
- Run pip show torch.
- Check torch version.
- Check torch.version.cuda.
- Run torch.cuda.is_available.
- If CUDA is false, uninstall CPU-only PyTorch.
- Install CUDA-enabled PyTorch from the official selector.
- Avoid mixing pip and conda installs.
- Create a fresh environment if needed.
- Move your model to the GPU.
- Move your input tensors to the GPU.
- Confirm tensor and model devices.
- Watch GPU usage with nvidia-smi.
Follow this checklist in order. It keeps the process simple and avoids the try-everything-and-hope approach.
Real-World Examples of Torch GPU Problems:
The same error can have different causes depending on the system setup. Here are a few common examples:
CPU-Only Installation:
A developer installs PyTorch using a generic pip command and notices that model training is extremely slow. Running torch. Cuda.is_available returns False even though an RTX GPU is installed. After checking the installation, they discovered that a CPU-only PyTorch build was installed. Reinstalling the CUDA-enabled version immediately solves the problem.
Driver Issue:
Another user installs a CUDA-enabled PyTorch package, but PyTorch still cannot detect the GPU. Running nvidia-smi produces an error. In this case, the NVIDIA driver is either missing or corrupted. Updating the driver restores GPU access.
Device Mismatch Error:
PyTorch successfully detects the GPU, but training crashes with an Expected all tensors to be on the same device error. The model was moved to CUDA, but the input data remained on the CPU. Moving both the model and tensors to the same device fixes the issue.
These examples show why it is important to diagnose the problem before making changes. The same symptom can have multiple causes.
FAQ’s:
Why is torch? Is CUDA available?
It usually means PyTorch cannot access CUDA. The most common causes are a CPU-only PyTorch build, a missing NVIDIA driver, an unsupported GPU, or a broken Python environment.
Can PyTorch use AMD GPUs?
Standard CUDA support is for NVIDIA GPUs. Some AMD GPU setups may work with ROCm, but the setup differs from CUDA and depends on your hardware and operating system.
Do I need to install the full CUDA toolkit?
Not always. Many PyTorch CUDA builds include the needed CUDA runtime. For normal PyTorch use, the correct PyTorch install and a compatible NVIDIA driver are usually enough.
Why does nvidia-smi work, but PyTorch cannot use the GPU?
This often means your NVIDIA driver works, but your PyTorch package is CPU-only or installed with the wrong CUDA build.
How do I know if my model is running on a GPU?
Check the model device:
print(next(model.parameters()).device)
If it shows CUDA:0, your model is on the GPU.
Conclusion:
When the torch cannot use the GPU, the issue is usually not as scary as it looks. Most problems come from a CPU-only PyTorch install, an outdated or missing NVIDIA driver, an unsupported GPU, or code that forgets to move the model and tensors to CUDA.
Start with the basics. Run nvidia-smi. Check torch.cuda.is_available(). Confirm torch.version.cuda. Then install the correct PyTorch build if needed. After that, make sure your model and data are both moved to the same device.
The best approach is calm and step-by-step. Once your environment is clean and your code uses a safe device pattern, PyTorch GPU problems become much easier to handle. With the right setup, you will be ready to train models faster, test ideas sooner, and make better use of the hardware you already have.