To remove a GPU safely, shut down and unplug the PC, open the case, disconnect the GPU power cables, remove the mounting screws, release the PCIe slot latch, then lift the card straight out while holding it by the edges.
This guide explains how to remove GPU components from most desktop computers. It also covers common problems, cleaning methods, safe storage, and the differences between custom, prebuilt, and small form factor systems.
If you are unsure whether your GPU is working properly, learn how to check motherboard damage from the GPU before removing it
Why You May Need to Remove a GPU:
The most common reason to remove a graphics card is to upgrade. A newer GPU can improve gaming performance, video editing, 3D rendering, and support for modern displays.
Cleaning is another common reason. Dust often collects around the cooling fans, heat sink, backplate, and PCIe slot. Heavy dust can reduce airflow and increase temperatures.
You may also remove and reinstall the GPU while troubleshooting display problems. This process is known as reseating the graphics card. It may solve problems caused by a loose connection, although it cannot repair damaged hardware.
Removing the GPU before transporting a desktop computer is also a sensible precaution. Large cards can place considerable weight on the PCIe slot. Rough movement during shipping may damage the slot, metal bracket, or graphics card.
Other reasons include:
- Replacing the motherboard
- Moving components into a new case
- Replacing the power supply
- Accessing an M.2 storage slot
- Installing a larger CPU cooler
- Testing the card on another computer
- Repairing a GPU fan
- Selling or storing the card
Regardless of the reason, the removal process should always be slow and controlled.
Tools You Need:
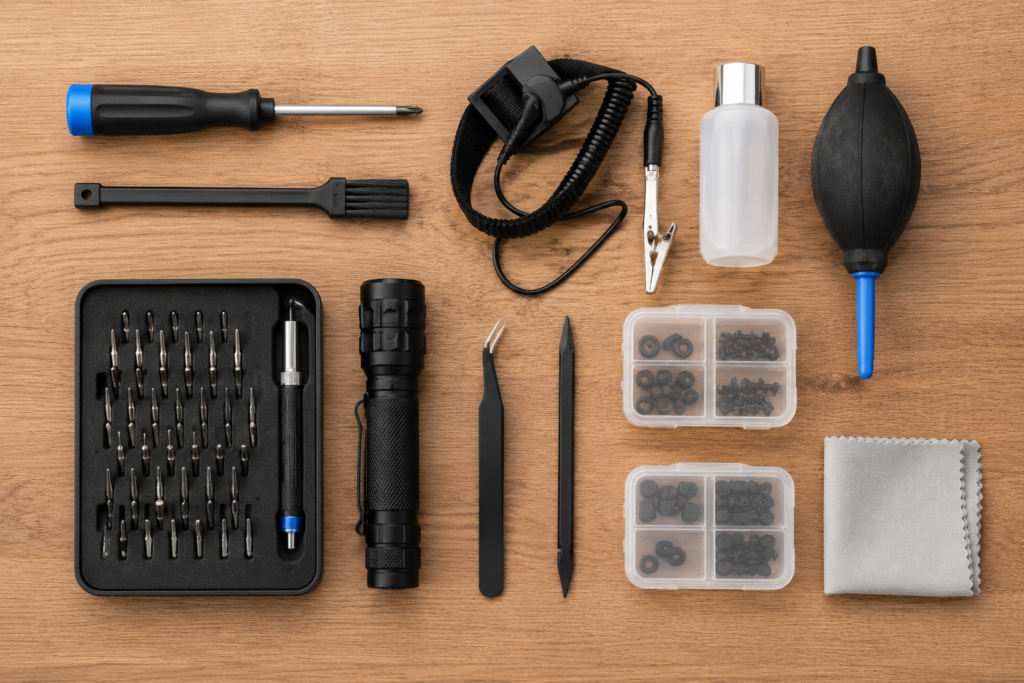
You only need a few basic tools to remove a graphics card.
| Tool | Purpose |
| Phillips screwdriver | Removes case and GPU screws |
| Small container | Keeps screws safe |
| Flashlight | Helps locate the PCIe latch |
| Anti-static wrist strap | Reduces the risk of static discharge |
| Anti-static bag | Protects the removed GPU |
| Phone camera | Records cable and bracket positions |
| Soft brush or air blower | Removes loose dust |
Use a screwdriver that fits the screws properly. A loose fit may damage the screw head and make removal more difficult.
Keep all removed screws in a tray or small container. Never leave loose screws inside the computer case because they may fall behind the motherboard or power supply cover.
Prepare a Safe Workspace:
Place the computer on a clean and stable table. Avoid working on carpet, a bed, or a soft sofa. These surfaces can create static electricity and may not support the case securely.
Choose a workspace that is:
- Clean
- Dry
- Well lit
- Free from food and drinks
- Large enough for the computer and GPU
- Away from pets and small children
Prepare a safe place for the graphics card before removing it. The original GPU box and anti-static bag are ideal. Avoid placing the card directly on carpet, bare metal, or ordinary plastic.
Safety Checks Before Removing the GPU:
Removing computer hardware while power is connected can damage components. Complete the following safety steps before opening the case.
Shut Down the Computer:
Save your work and shut down the computer through the operating system. Do not rely on sleep mode or hibernation.
Wait until the fans and lights stop. Some motherboard lights may stay on while the power supply remains connected.
Turn the power supply switch to the off position if one is present. The off position is usually marked with an O.
Unplug the main power cable from the computer. Then press the power button for about ten seconds. This can help discharge remaining power in the system.
Disconnect External Cables:
Remove every cable connected to the computer, including:
- Power cable
- HDMI cable
- DisplayPort cable
- USB cables
- Ethernet cable
- Audio cables
- Keyboard and mouse cables
- Wi-Fi antenna connections
The display cable is especially important because it may be connected directly to the graphics card.
Taking a quick photo of the rear connections can make it easier to reconnect everything later.
Protect the Hardware From Static Electricity:
Static electricity can damage sensitive computer components even when no spark is visible.
An anti-static wrist strap offers useful protection when connected correctly to a grounded metal surface.
Without a wrist strap, touch an unpainted metal part of the computer case before handling internal parts. Repeat this regularly while working.
Avoid working on carpet or wearing clothing that creates heavy static.
When holding the GPU, use the metal bracket, plastic shroud, backplate, or solid outer edges. Avoid touching the gold PCIe contacts and exposed circuit board components.
How to Remove a GPU in 9 Steps:
The exact process may vary between cases and motherboards. Some computers use tool-free covers, support arms, vertical mounts, or PCIe riser cables. However, these nine steps apply to most desktop systems.
Step 1: Open the Computer Case:
Place the computer on its side so the motherboard faces upward. On most standard cases, this means opening the left side panel.
Remove the screws that hold the panel in place. Many cases use two thumb screws at the rear. Others use a button, latch, or sliding lock.
Support a glass panel with one hand while removing the final screw. Tempered glass can break if it falls or strikes a hard edge.
Place the removed panel somewhere safe where it cannot be knocked over.
Step 2: Locate the Graphics Card:
The graphics card is usually a large horizontal component connected to the motherboard. Its HDMI and DisplayPort connections face the rear of the case.
A dedicated GPU often has:
- One or more cooling fans
- A large metal heat sink
- A backplate
- Power cables from the power supply
- A printed brand or model name
- A support bracket underneath
Do not confuse the GPU with a smaller sound card, Wi-Fi card, or capture card. The graphics card normally uses the longest PCIe slot and covers more rear expansion spaces.
Take a clear photo before disconnecting anything. This can help when reinstalling the same card later.
Step 3: Disconnect the GPU Power Cables:
Many graphics cards receive extra power through cables connected to the top or side of the card. Common connector types include six-pin, eight-pin, twelve-pin, and sixteen-pin plugs.
Some low-power graphics cards do not need an extra power cable.
Find the locking clip on each connector. Press the clip fully, then hold the plastic connector body and pull it out gently.
Do not pull the connector by its wires. This can loosen or damage the internal terminals.
If the plug feels tight, use a small and controlled side-to-side movement. Avoid twisting it sharply or using a metal screwdriver to force it loose.
Move the disconnected cables away from the GPU so they cannot catch on the card during removal.
Step 4: Remove the GPU Support Bracket:
Large graphics cards may use a support bracket to prevent sagging. The bracket may attach to the case floor, rear frame, front frame, or the card itself.
Common support systems include:
- Vertical support posts
- Adjustable GPU braces
- Rear metal brackets
- Plastic support arms
- Manufacturer-specific locking frames
Support the graphics card with one hand while removing the bracket. Once the bracket is gone, the weight of the card will rest mainly on the PCIe slot and rear screws.
Keep the bracket and its screws together for later use.
Step 5: Remove the Rear Case Screws:
The metal bracket at the rear of the graphics card is normally secured to the case with one, two, or three screws.
Hold the GPU steady with one hand while removing these screws.
Some computer cases use a shared expansion slot cover instead of separate screws. Open or remove this cover before continuing.
Place the screws in your container. Do not allow them to fall inside the case.
The GPU may move slightly after the screws are removed. Do not lift it yet. The PCIe retention latch is still holding the card in place.
Step 6: Find the PCIe Retention Latch:
The PCIe retention latch is the small plastic lock at the far end of the motherboard slot.
Not sure how PCIe slots actually work? Understanding the basics can make GPU removal much easier. This quick PCI Express guide explains it clearly.
Depending on the motherboard, it may look like:
- A small plastic tab
- A hinged locking arm
- A sliding release
- A push button
- An extended-release mechanism
Large graphics cards can hide the latch from view. Use a flashlight to look between the GPU and nearby components.
Check the motherboard or computer manual if you cannot identify the release mechanism. Different motherboards may use different latch designs.
When the Latch Is Difficult to Reach:
Large triple-fan GPUs often leave very little space around the PCIe latch. Do not push your fingers between sharp heat sink fins.
A clean plastic spudger may help you reach the latch. Press only the plastic release. Avoid touching or scraping small components on the motherboard.
Do not use excessive pressure. If the motherboard begins to bend, stop and check the latch direction again.
Step 7: Release the PCIe Latch:
Support the GPU with one hand while pressing or moving the PCIe latch with the other.
Many standard latches release when pushed downward toward the motherboard. Others move sideways or use a separate release button.
You may hear or feel a small click when the latch opens.
Keep the graphics card level while releasing it. Pulling one side upward before the latch is open can place uneven pressure on the PCIe slot.
If the latch will not move, check that:
- The rear screws are removed
- The support bracket is detached
- The card is sitting level
- No cable is pulling on the GPU
- You are pressing the correct part
- The latch is not blocked by dust or another component
Sometimes gently pressing the GPU back into the slot removes pressure from the latch and makes it easier to release.
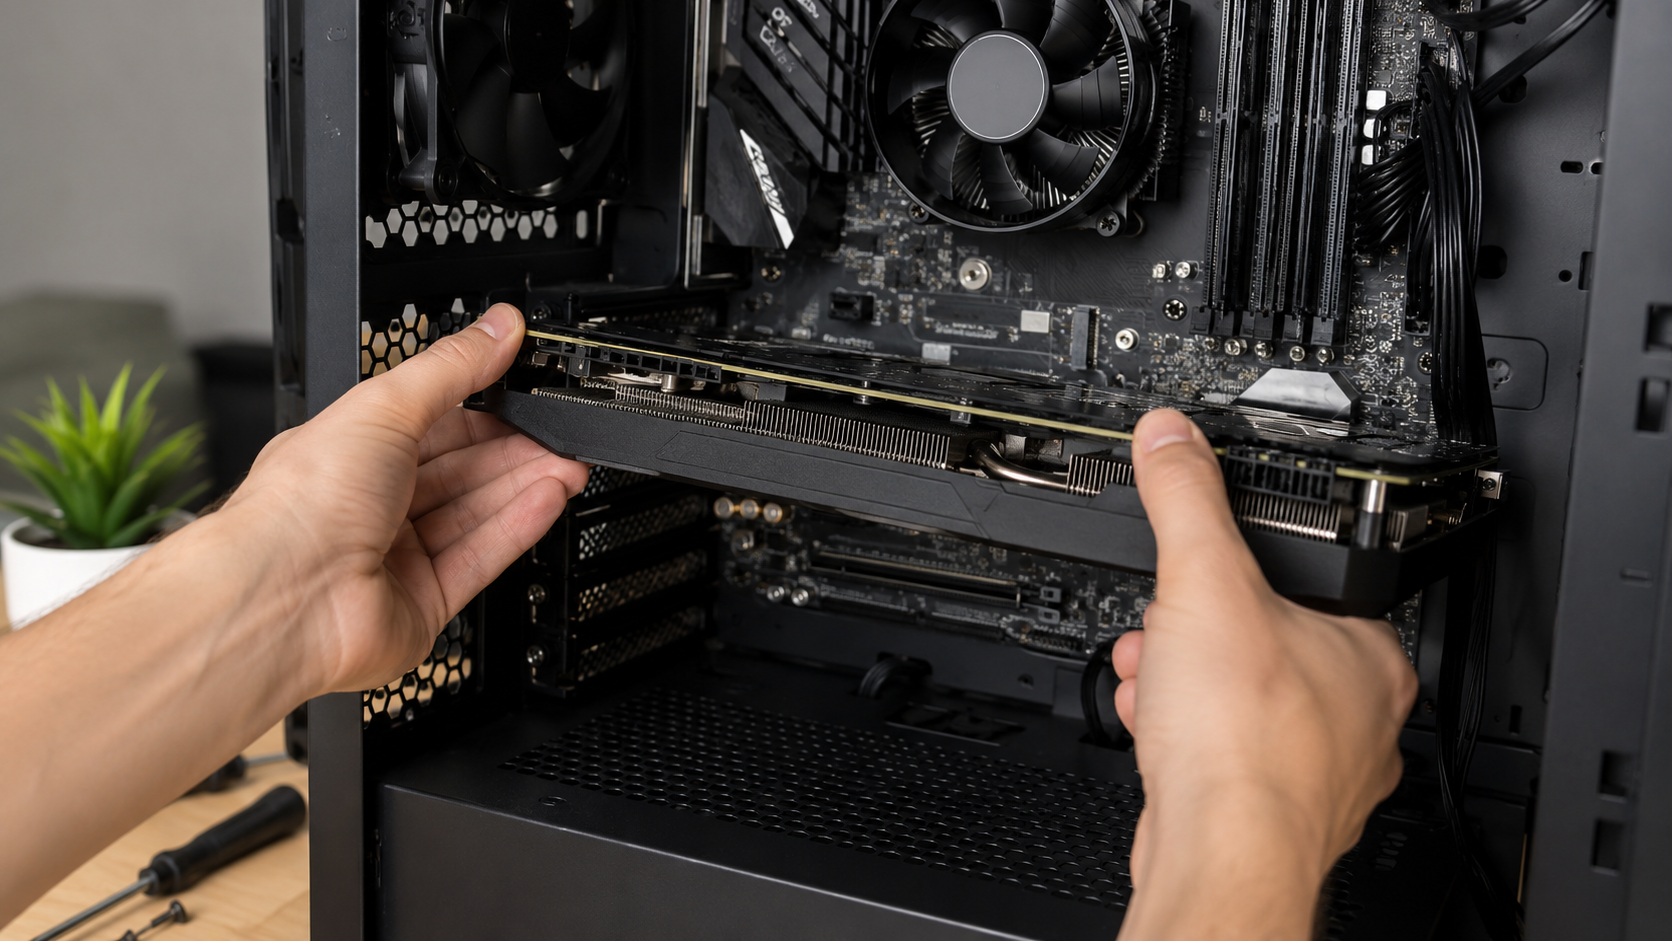
Step 8: Remove the Graphics Card
After releasing the latch, hold the GPU with both hands. Support both ends so the card remains level.
Pull the graphics card evenly away from the motherboard. Keep it perpendicular to the PCIe slot.
A very small side-to-side movement may help if the connection is tight. However, do not twist, bend, or sharply rock the card.
Watch the rear metal bracket carefully. It can catch on the case opening.
Never lift the GPU by its:
- Cooling fans
- Power wires
- Heat pipes
- Small circuit board parts
- Loose plastic covers
If the card stops moving, return it to a stable position and check the screws, cables, bracket, and PCIe latch again.
Step 9: Store the GPU Safely
Place the removed graphics card inside an anti-static bag.
Store the bag inside the original GPU box when possible. Use protective foam to prevent movement, but do not press hard material against the cooling fans.
Keep the card in a clean and dry place. Protect it from moisture, direct sunlight, heavy objects, and sudden temperature changes.
Do not place the GPU on:
- Carpet
- Bare metal
- A rough floor
- A soft bed
- A wet surface
- An ordinary plastic bag
- A pile of loose computer parts
If you are storing several graphics cards, label each package with the model name and condition.
What to Do After Removing the GPU
Once the graphics card is out, inspect both the card and the computer before installing anything else.
Inspect the PCIe Slot
Use a flashlight to check the empty motherboard slot for:
- Dust
- Loose screws
- Damaged plastic
- Bent parts
- Foreign objects
- Signs of overheating
Do not insert metal tools into the slot. Loose dust can be removed with a controlled air blower while the computer remains unplugged.
Check that the retention latch is still attached and moves normally.
Clean the Graphics Card
Use a soft brush or controlled air blower to remove loose dust from the GPU fans and heat sink.
Hold the fans still while using air. Allowing them to spin at very high speed may damage the fan mechanism.
Wipe the outer surfaces with a clean, lint-free cloth. Do not spray liquid directly onto the card.
Removing the cooler, replacing thermal paste, and changing thermal pads are advanced tasks. They may also affect the manufacturer’s warranty.
Install a Replacement GPU
Before installing a new graphics card, confirm that it is compatible with your system.
| Check | Why It Matters |
| GPU length | It must fit inside the case |
| GPU thickness | It may cover several expansion slots |
| Power supply capacity | The system must provide enough power |
| Power connectors | The cables must match the GPU |
| Motherboard slot | A compatible PCIe slot is required |
| Case airflow | The card needs enough cooling space |
| Display outputs | Your monitor cable must fit |
Open the PCIe latch before installation. Align the card with the slot and press it down evenly until it is fully seated.
Secure the rear screws, reinstall the support bracket, and reconnect the required power cables.
Common GPU Removal Problems
If your GPU is not performing well, you may want to understand what GPU-bound means.
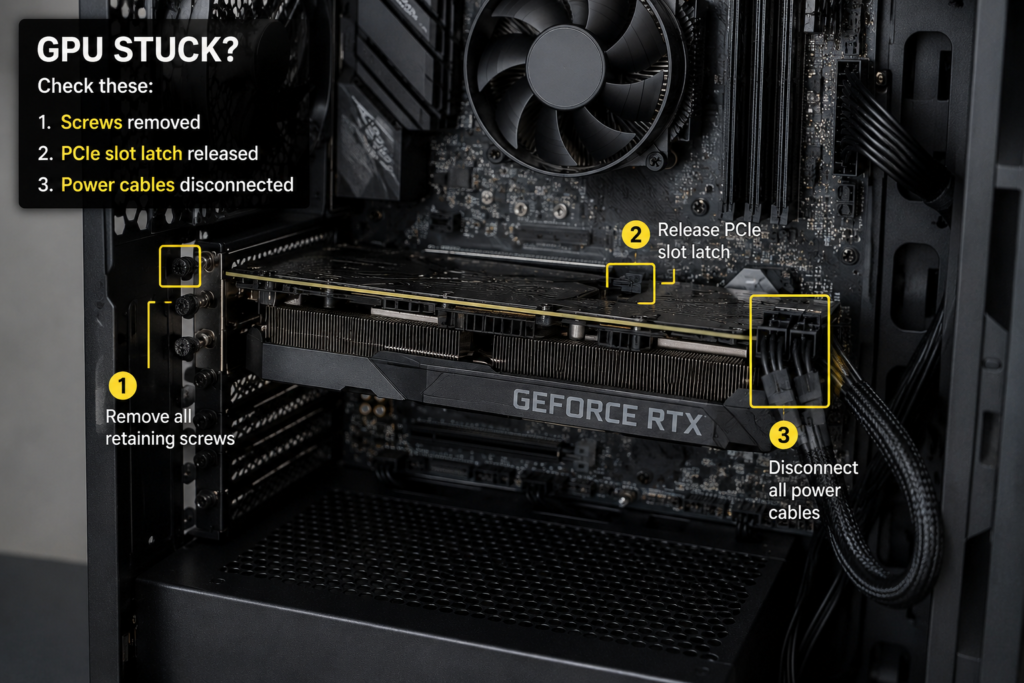
The GPU Will Not Come Out
Check the four main holding points:
- GPU power cables
- Rear case screws
- Support brackets
- PCIe retention latch
Also, look for a vertical GPU mount, riser cable, or shared expansion slot cover.
Do not pull harder until every connection has been checked.
The PCIe Latch Will Not Move
Confirm which direction the latch should move. The motherboard manual is the best reference.
Push the GPU gently toward the motherboard to reduce pressure on the latch. Then try releasing it again.
Stop if the latch bends heavily or the motherboard begins to flex.
Some modern motherboards use an extended button or remote release. Check for this feature before pressing the standard latch.
The Power Connector Is Stuck
Make sure the locking clip is pressed completely.
Hold the plastic connector body and move it gently from side to side. Never pull the wires.
Check whether nearby cables or a case panel are blocking your grip.
The GPU Is Too Heavy to Handle
Large graphics cards can be difficult to hold while reaching the PCIe latch.
Keep one hand under the card while releasing the latch with the other. If the case is cramped or the GPU is unusually heavy, ask another person to support it.
Creating extra space by removing a nearby bracket may also help. Follow the case manufacturer’s instructions before removing additional parts.
Common Mistakes to Avoid
Avoid these mistakes when removing a GPU:
- Working while the computer is connected to power
- Pulling the card before releasing the PCIe latch
- Forgetting the rear screws
- Pulling power connectors by their wires
- Touching the gold PCIe contacts
- Twisting the card
- Dropping screws inside the case
- Placing the GPU on the carpet
- Using metal tools near motherboard components
- Holding the card by its fans
- Leaving a heavy GPU unsupported
- Ignoring the manufacturer’s service manual
A properly released graphics card should come out with controlled and even pressure. Strength should never replace careful inspection.
Removing a GPU From Different Types of Computers
Custom Gaming Desktop
Custom gaming computers usually use standard cases and motherboards. The removal process normally follows the nine steps in this guide.
However, check for support brackets, vertical GPU mounts, and unusual case covers before starting.
Prebuilt Desktop Computer
Prebuilt systems from Dell, HP, Lenovo, Acer, ASUS, and other manufacturers may use special support arms or locking frames.
Search for the service manual using the exact computer model. The model number is usually printed on the rear, side, or bottom of the case.
Manufacturer instructions are especially important when the system uses custom brackets or tool-free locks.
Small Form Factor Computer
Small form factor computers have limited internal space. They may use:
- Low-profile graphics cards
- PCIe riser cards
- Riser cables
- Compact power connectors
- Tool-free locking covers
- Custom cooling ducts
The graphics card may be attached to a riser assembly instead of plugging directly into the motherboard.
Do not assume it should pull straight upward. Follow the service manual for the exact system.
Laptop Computer
Most laptop graphics processors are soldered to the motherboard and cannot be removed like a desktop graphics card.
Some older gaming laptops and mobile workstations use removable graphics modules. Reaching them may require removing the battery, cooling system, and motherboard covers.
Use the laptop’s service manual or contact a qualified technician. Desktop GPU removal instructions should not be used for laptops.
FAQ‘s:
Can I remove a GPU without an anti-static wrist strap?
Yes, but you should take extra care. Work on a hard surface, avoid carpet, unplug the computer, and touch an unpainted metal part of the case before handling components.
An anti-static wrist strap provides additional protection when used correctly.
Why is my GPU stuck after removing the screws?
The PCIe latch may still be locked. A power cable, support bracket, vertical mount, or expansion slot cover may also remain attached.
Do not force the card. Check every connection again.
Do I need to uninstall GPU drivers before removing the card?
No, Drivers do not need to be removed before physically taking out the graphics card.
However, uninstalling old drivers may be useful when switching between different GPU brands or troubleshooting software problems.
Can removing a GPU damage the motherboard?
Yes, pulling the card while the PCIe latch is locked can damage the slot. Twisting a heavy GPU or using excessive force can also harm the motherboard.
Keep the card level and release every connection first.
How much force should I use?
Use firm but controlled pressure.
Stop if the card twists, the motherboard bends, or the rear bracket catches on the case. These signs usually mean that something is still holding the GPU.
Can a computer run without a graphics card?
It depends on the processor and motherboard.
A computer can display an image without a dedicated GPU when the processor has integrated graphics and the motherboard provides a compatible display output.
A processor without integrated graphics normally requires a dedicated graphics card.
You may also want to reset your GPU after reinstalling it to fix performance issues. How to Reset the GPU?
Conclusion
Knowing how to remove a GPU safely makes computer upgrades, cleaning, repairs, and transport much easier.
Start by shutting down and unplugging the computer. Disconnect the GPU power cables, remove the support bracket and rear screws, then release the PCIe latch.
Hold the graphics card with both hands and remove it evenly from the motherboard. If the card feels stuck, stop and check for a hidden screw, cable, bracket, or locked latch.
After removal, store the GPU in an anti-static bag and protective box. Careful handling protects both the graphics card and the motherboard from unnecessary damage.